Have you ever dreamed about be able to carry with you a device that will not leave you in the middle of nowhere by running out of battery, depriving you of usefull data at the worst moment, when you needed it ?!
Few years ago i was very convinced of the powerful ability of the E-ink screen’s technologies to save the précious energy of lithium’s batterys. But i was disapointed how theses screens where used for.. Most of the time, they were only used for e-book reader.. and that’s all.
That’s why i’m here today, to share with you my work and research about the modding and hacking of the Nook Simple Touch of Barnes & Nobles.
When the lowest become the best
Only 256 MB of RAM, a 800Mhz monocore ARMv7-A’s type CPU , no GSM, no GPS, no Bluethooth, no backlight, no speakers, But a splendid 6 inch 600 x 800 pixel E-Ink Pearl screen, sd-card slot and an old Android/Linux OS ❤️
This low tech hardware profile is actually a succes receipe of the 2010’s Ebooks Readers. Why ? Because it’s only does the work for what is have been built, it does great and does for a long, very very long time compared to any other modern electronics devices.
And this is not a surprise, all thoses choices have been made to compete with one of the most power effiancy support in the world .. the paper.
Their specs made me dream. Generaly thoses E-book reader are selled for 1/2h of usage per day and 2 month between each recharge. I’m personally very impressed.
Why using a numeric atlas ?
If you grew up in the early 90’s or before you will probably remember the road trip vacation in the family car with your parents. After 5 hour of travel you were woken up by them fighting about the right path to take on an 1m² paper’s map they have bought at the gaz station. Folded and unfolded hundred of time before finding the interest area.
In the end, nobody is agreed with each others about the right path, you make a break every 10km to check it again, the dashboard of car have been command center with the road map fully deployed on top of it.
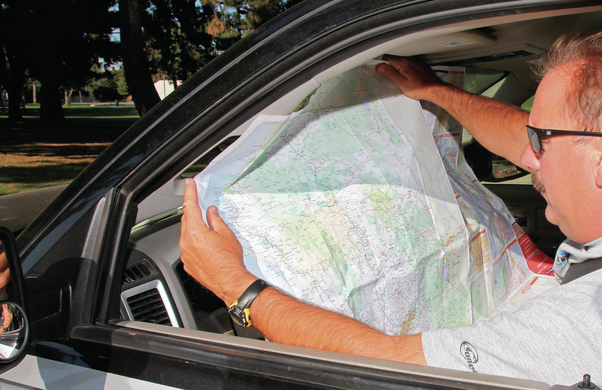
That’s why electronic GPS supports has supplanted old fashion paper map most of the time. but not for all usages !
If you are looking for outdoors activity over « long » periods it will generaly be wizer to choose the paper’s map due to is reliability against a smartphone battery. Of course you can carry external bank, solar panel or whatever but they are not the lightest things to have in your backpack.
So what i’m looking to do do here is to bridge theses two world. By choosing the numeric map because it’s far more easy to manipulate than a large paper. But also to keep a long automomy, at least for weeks in situation you would’nt be able to find a power supply like during long hike for exemple where autonomy is not really an option.
At this point if you choose to use an electronic devices it would be interesting to have a GPS function, it will be stupid to use it without this option.
Research and developpment
Ok, to reffer to my last explaination it seem we are on the right way to couching the wanted specifications.
- Numeric offline map with large area and enought detailed.
- A really long autonomy, at least for some weeks.
- A switchable GPS function would be a killer feature.
- Must be lightweight and solid due to outdoor usage.
At this time i remembered some e-book have a very long autonomy, their screen are black and white but with a 16 grayscale, and seems to have enough resolution to carry a detailled map.
But how i should i do it ? Should i try to transcript my map in PDF ? Or making large JPEG / SVG ? what about the GPS i’ve ,ever heard of any reader with GPS it will be an nonsense for a constructor to implement it..
So.. of course i have crawled the web for an hundred of hours again to try find a solution to this problem, a miraculous product on the market who will solve this quest .. but nop.. nothing. Just some overpriced small 2.5 inch GPS with 24h autonomy or an old abandonned project like « Meet Earl » :

After many research i was now pretty sure a modded e-reader would be a great base to create something on top of it. But i would need to solve two problems.
The N°1 (First) was with the operating system who’s running on the E-Reader itself, i’m used to mod and flash android systems. When i was a kid it was a game for me, so an Android e-reader will make the task easier for me. Also i would probably be helped by the existing work of devs community.
The N°2 (Second) was to find an e-reader who have a built-in GPS module or with a way to mod and implement that.. not the easier part.
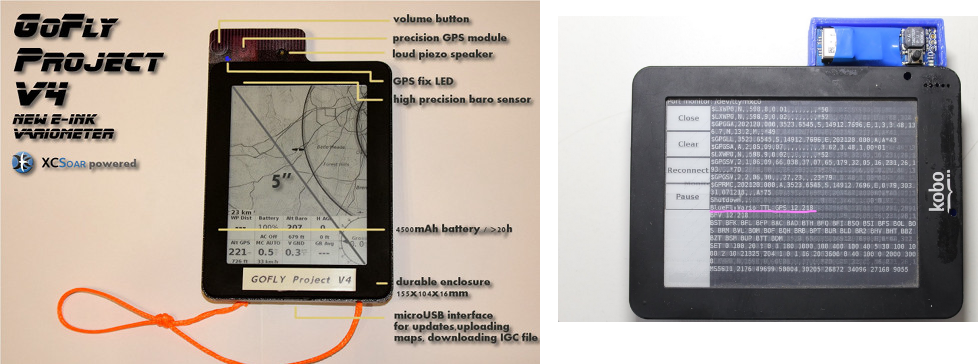
Unforntunally at first i was unable to solve those two points with one product. But i discovered somes people are modding E-book tablets like Kobo or B&N Nook as Fly computer for Glider and Parapenting .. Very interesting.
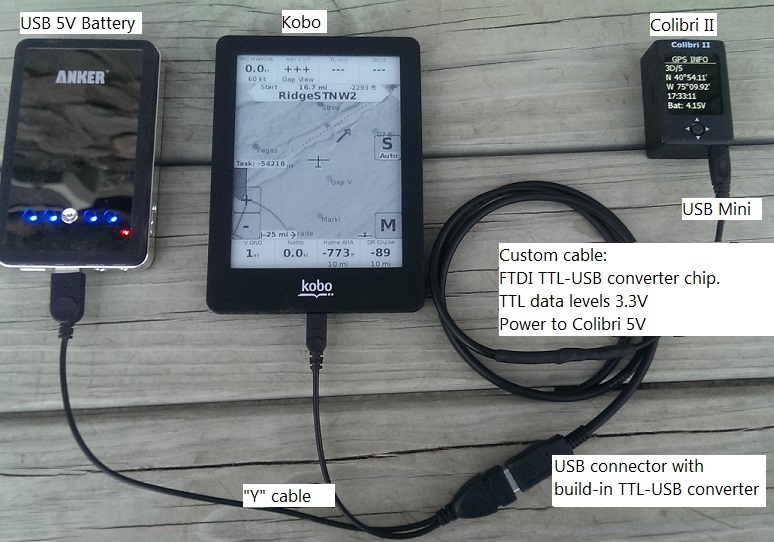
This, is a very typical configuration for homemade’s fly computer. You have in the center the main E-reader (Kobo here with Xcsoar fly app installed on it) An USB OTG Y cable to carry externals devices on the tablet but powered by an external bank. And at the end on the right a GPS/Variometter instrument for fly. This little Colibri II is a great piece of techno but it also cost almost 500$ .. Ouuuh làlà 🥵💰
Okay this setup are actually solving a part of the problem N°2, it give you a GPS. Ok but .. i’m now wearing with me a tons of cables, a powerbank .. Yeah great thank’s you guys. So it’s not a suffisant setup for me. Also it’s create two subproblems. the first this setup is not really a power efficient solution and also it’s not a native GPS so the Android system will not be a able to use it directly. You will need to build or found a workaround. Because in the glider case the flight program take care of driving the external gps by USB.
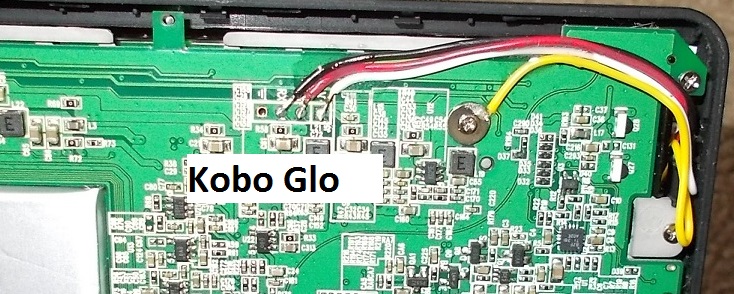
By following my research on the homemade fly computer’s i have found thath some guys are modding the hardware to exploit e-book serial’s port directly on the motherboard’s as an instrument input. Basicly some e-book reader have an UART port on their motherboard and some of them are directly usable and are delivering 3.3v power due to voltage regulator mounted on it.
At this point it was a very very good news, now i have a solution to add a low power GPS chip. Of course the problems with the OS still pending for the moment.
Two product’s on the market were available to receive this UART mod, somes Kobo’s e-readers and the Nook Simple Touch of Barnes & Nobles.
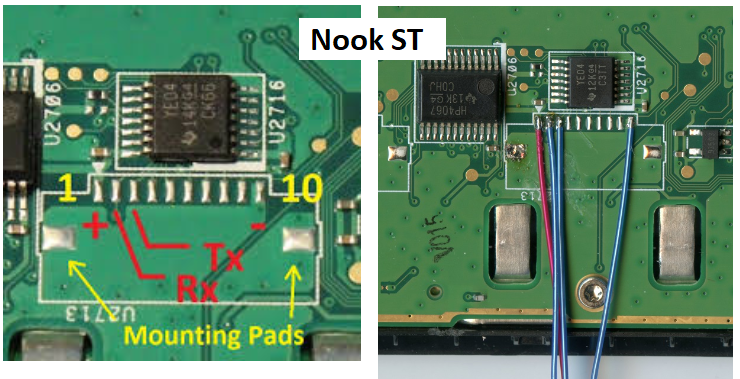
In the paraglider community i have found some great work about Kobo’s UART and plastic case mod. But almost nothing on the Nook side, juste somes docs and links to the UART pinout and soldering.
Time to bet on the right horse
Of course somes other research had been performed before choosing and buy on of thoses two e-ink books reader but the essential is here, there is the hardware GPS on it, the rest is software question, of course i can try to get more documentions, but the best is to try over and achieved what i want.
To be direct and clear i choose … The Nook Simple Touch
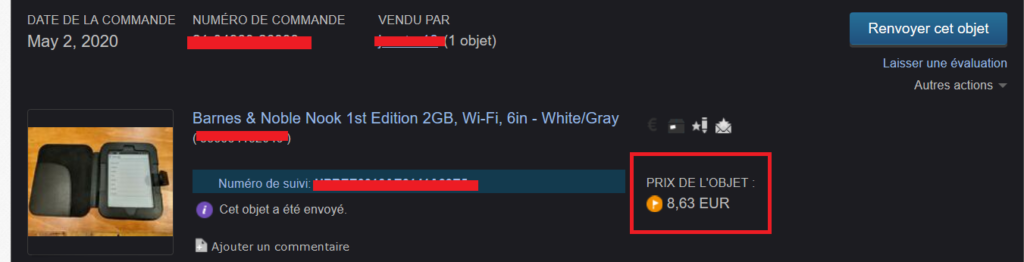
Why the heck to choose the less documented and the less simple motherboard to solder .. First because it’s a native Android OS on it and the XDA devs community is bigger than the Kobo’s Android community. Second because it’s cheap around 10$ on ebay. So let’s play !
Prepare and hack the software
Before all i wan’t to take a minute to say thank’s to the XDA community for it’s huge work, not only on this Nook but all the devices i ever had to this day.
Get the latest update
The nook is not a youg device, be sure to have the latest 1.2.2 update due to some global security update on the internet you need it.
Setup the computer toolbox
Follow the Install ADB & Fastboot toolbox instructions.
Rooting the device
Nothing more to says, all is here, in this thread. The nook manager tool will root this device for you.
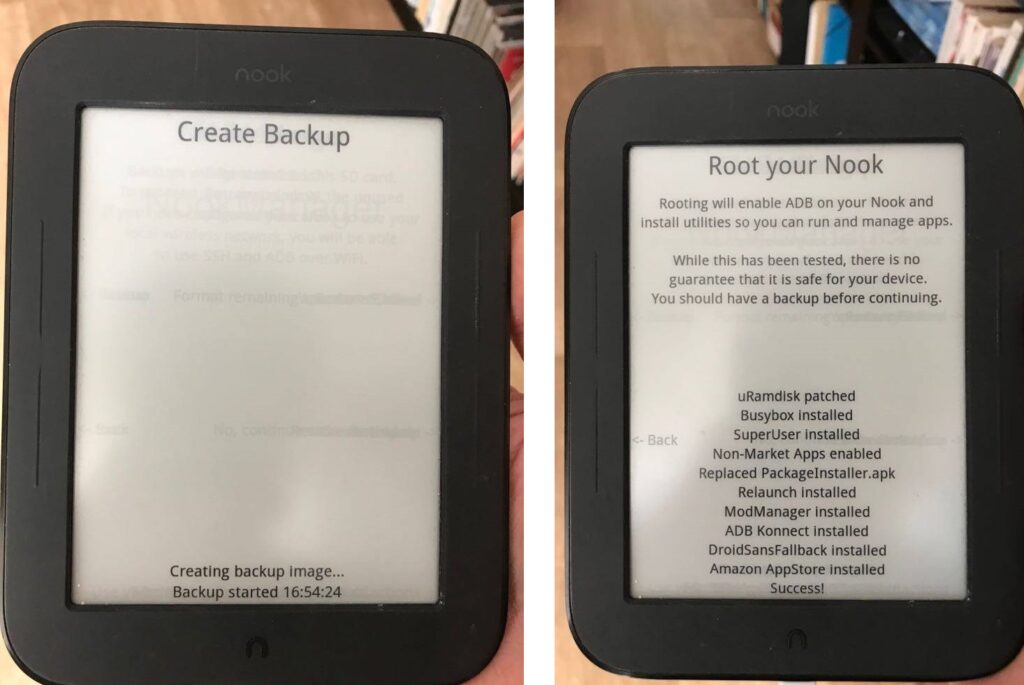
Personnaly i have also installed the Clockworkmod recovery on it. Free to you installing a custom rom but i have not been really convinced by them.
But it will be necessary later if you want to be able to keep the last image as screensaver when locked.
Setup the Nook Touch Mod Manager
Follow this XDA Thread it will unlock a lot of great feature.
Installing a maps program
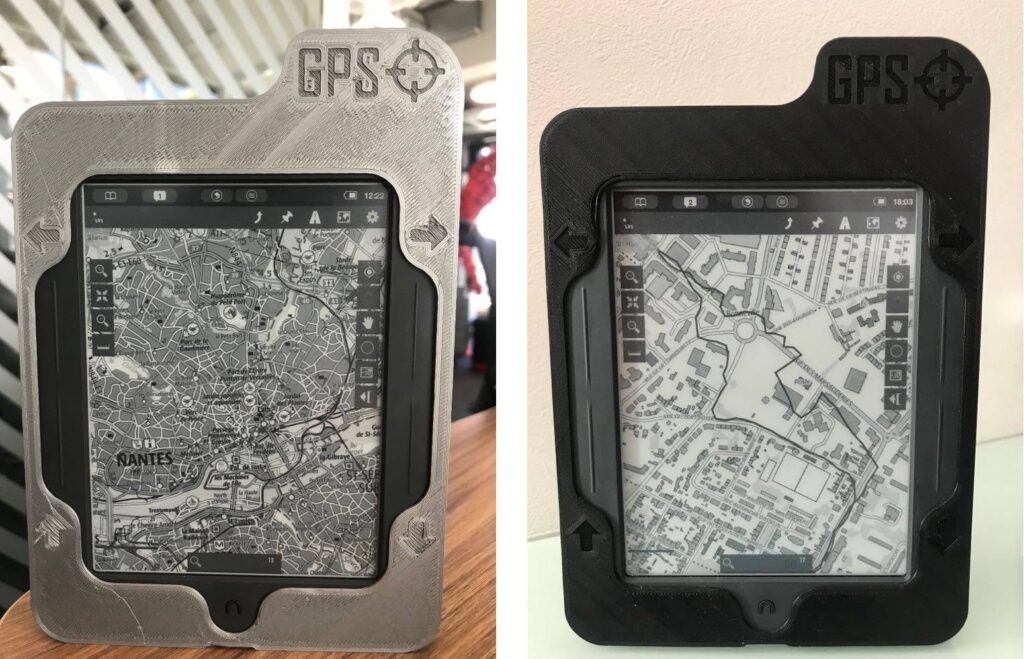
The holy graal would to have a real map software, like a google map’s but designed for offline guidance. My choice was on an old version of OruxMaps. (v5.5.22) compatible with Android 2.1 OS

This Maps app is pretty great, GPX, KML, maps offline / online, layering, waypoints and more all my need were here. I will not go further on how to use it there is many documentation on the web about it, but i can just say to you i’m using the software Mobac (Mobile Atlas Creator) on PC to generate my offline map.
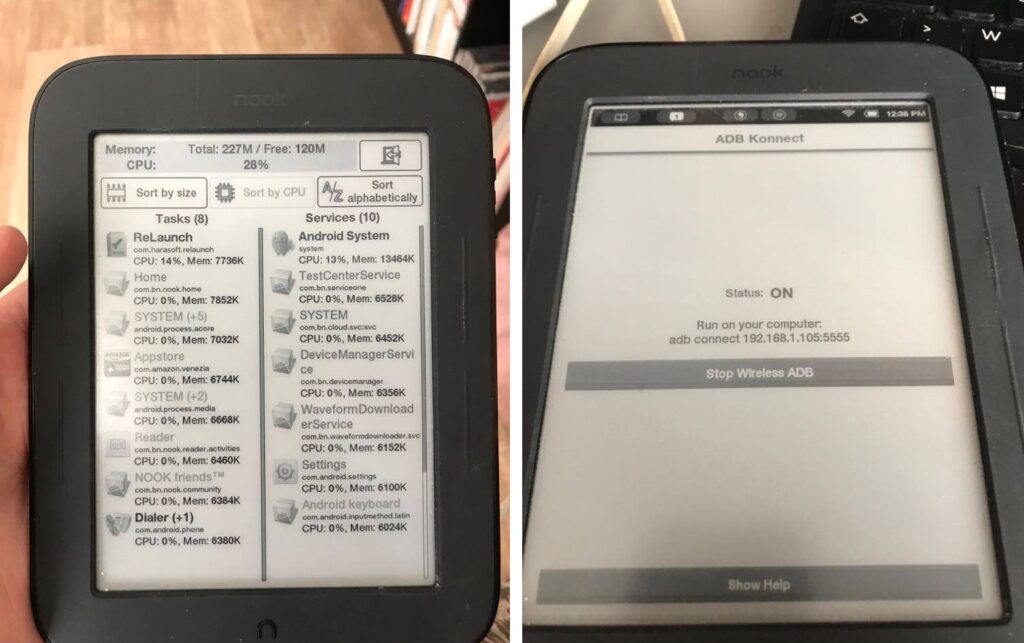
# On the rooted nook
Connect the nook to the Wi-Fi, Run the ADB Konnect app, Start wireless ADB
# From the command line ADB/Fastboot toolbox
adb connect 192.168.x.xxx:5555
# Install OruxMaps from ADB tools
adb install OruxMaps5.5.22.apk
You can also install some good apps in the same time :
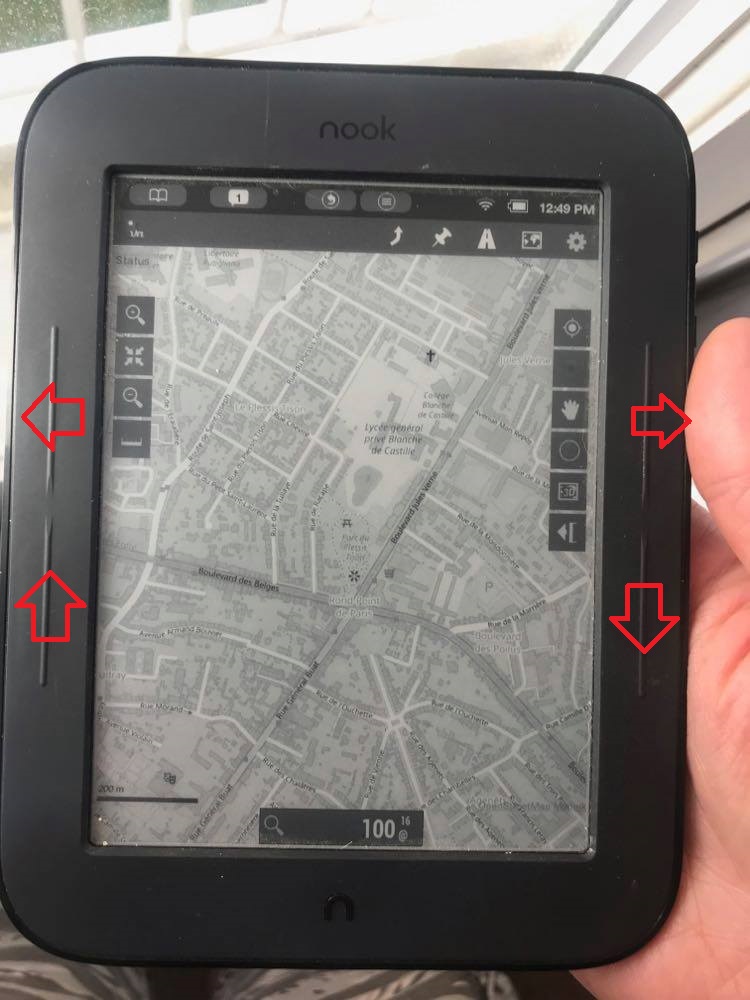
Modding the physicals buttons
As you can see upper pictures there is four physical buttons designed to navigate during books reads. Actually you can also navigate with the touchscreen, so thoses buttons can be turned for a new purpose.
This is for me another good point in favor of the Nook vs Kobo’s there is some physical buttons that i can mod for mooving the map for exemple. It’s sound great because i will be able to use it trought a plastic rain protective case during hiking trips.
For that you have to tweak the keypad layering file of the android system.
According to this XDA documentation i put below the commands but also my moddified file if you want to do the same.
# On the rooted nook
Connect the nook to the Wi-Fi, Run the ADB Konnect app, Start wireless ADB
# From the command line ADB/Fastboot toolbox
adb connect 192.168.x.xxx:5555
# Backup your Nook layout before all
adb pull /system/usr/keylayout/TWL4030_Keypad.kl
# Inject the modded TWL4030_Keypad.kl file
adb shell mount -o rw,remount -t ext2 /dev/block/mmcblk0p5 /system
adb push TWL4030_Keypad.kl /system/usr/keylayout/
adb shell chmod 644 /system/usr/keylayout/TWL4030_Keypad.kl
Change the stock images set
If you haven’t put pictures in the « screensaver » folder of your Nook or when is connected in USB to a computer, the nook will come back to his default set of pictures, and particulary the very specific fallback is the Brontë sisters. Personaly it’s not really my favorite .. 😁
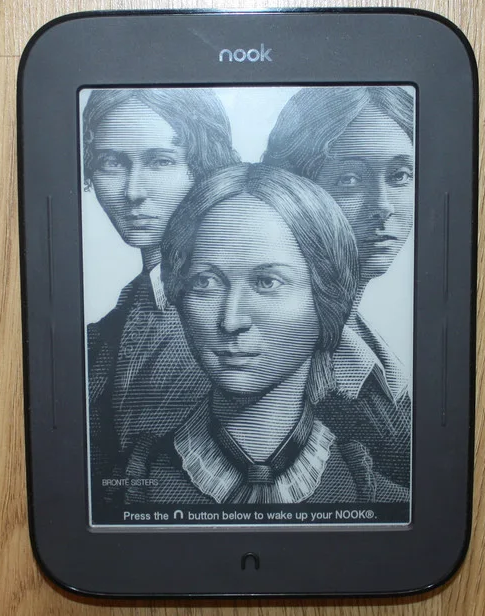
I will change it to something who match better with this GPS Maps Atlas. What do you think about a figure of the mythologic titan Atlas himself ?
Any 800×600 300 ppp image in png format will do the job.

# On the rooted nook
Connect the nook to the Wi-Fi, Run the ADB Konnect app, Start wireless ADB
# From the command line ADB/Fastboot toolbox
adb connect 192.168.x.xxx:5555
adb shell mount -o rw,remount -t ext2 /dev/block/mmcblk0p5 /system
adb push default.png /system/media/screensaver/
adb shell rm /system/media/screensaver/authors/*.png
adb push Bronte_Sisters.png /system/media/screensaver/authors/
adb shell chmod 777 /system/media/screensaver/default.png
adb shell chmod 777 /system/media/screensaver/authors/Bronte_Sisters.png
adb shell reboot
Retain the last screen image when locked
This func will allow you to keep your map in screensaver when the screen is locked for example. View it will be without power. This thread cover the tweak.
Use the ClockWorkMod recory to make a backup and flash Services-patch.zip
Hardware GPS modding
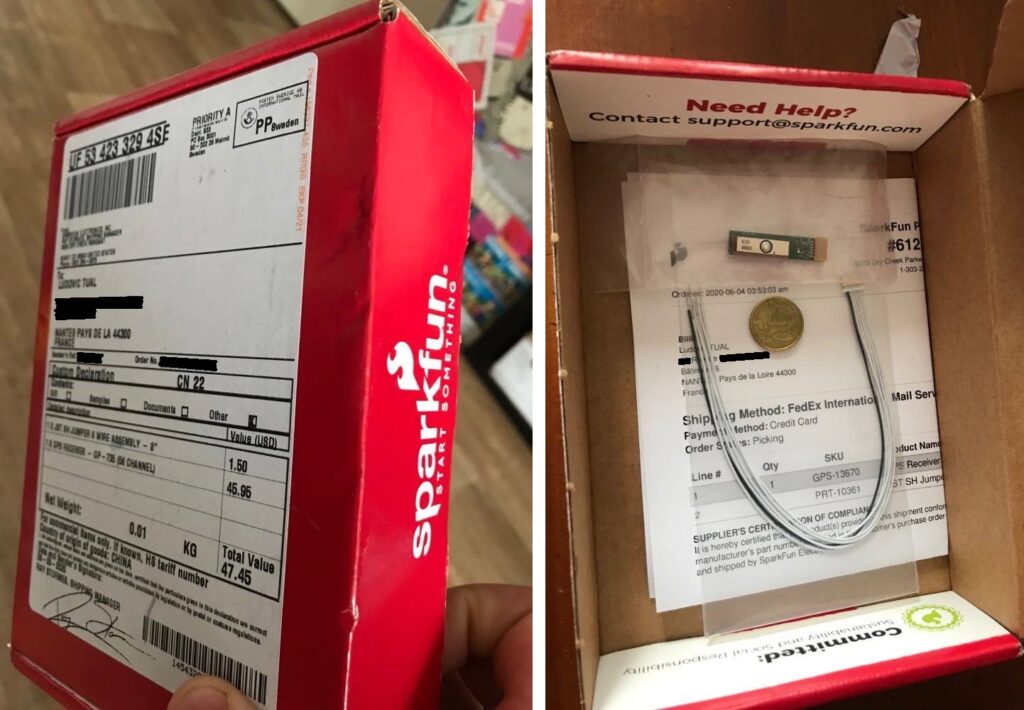
According to the existing work made by the Top Hat Soaring community of Paraglider i have ordered a GP-735 GPS module from Sparkfun (45.95$).
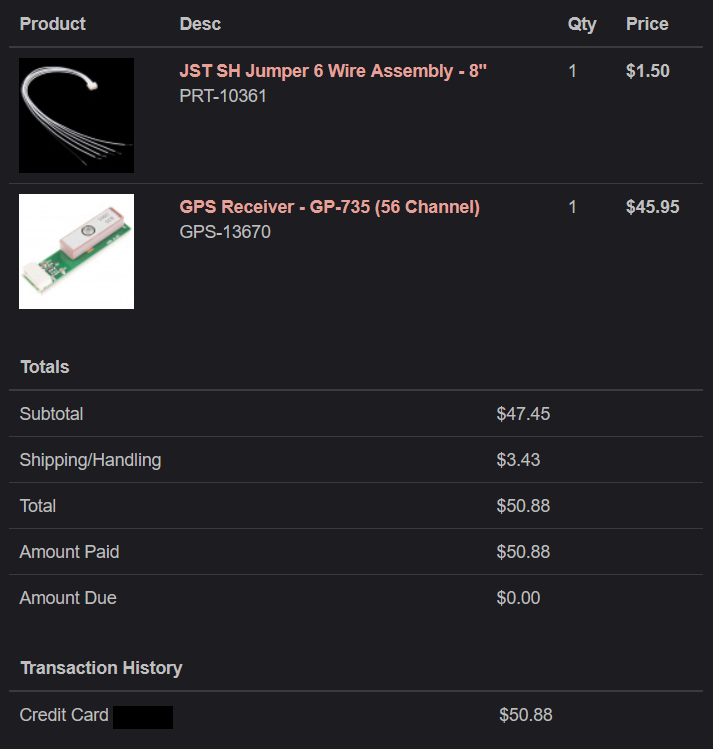
This module is really impressive by how tiny it is, but also by how performant it is. not less than a 56 Channel receiver with a -162dBm of tracking sensitivity for a consumtion of only 0.12 Watt (37mA and 3.3V).
Of course the most of UART/TTL Serial GPS receiver on the market will work and fit with this setup. Not only the GP-735 is choice, you can get a cheap one if you want.
Sorry, i haven’t any banana for scale so i put an 10 cent coin instead. 😉
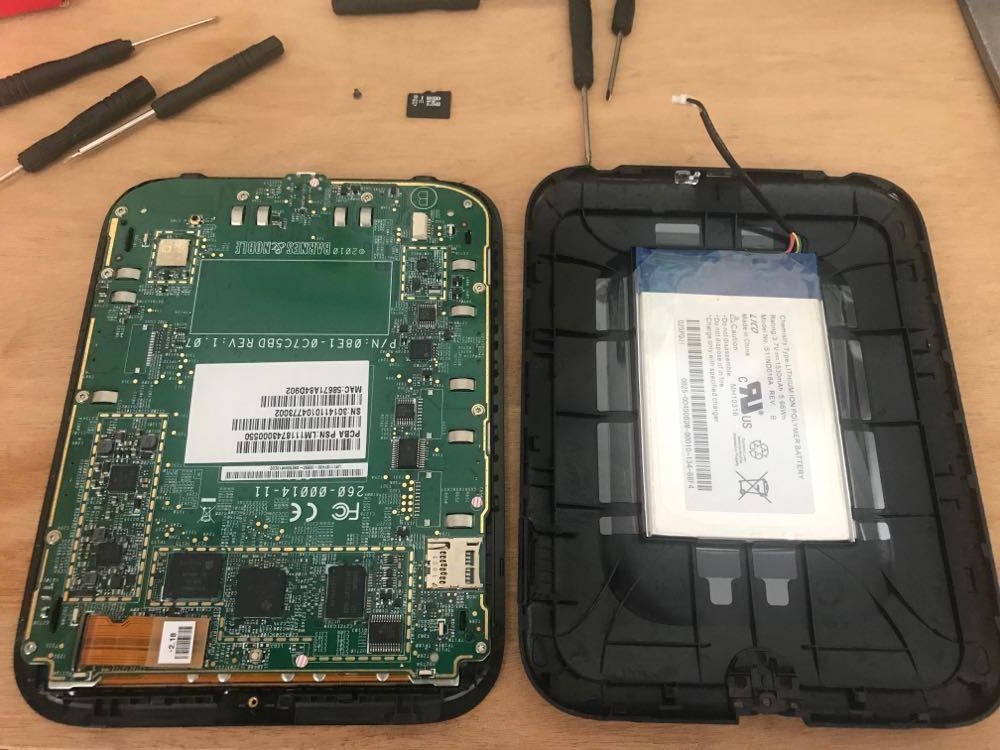
Go for opening the nook to reveal the motherboard and the 1500mah battery.
Now, a little zoom on the U2173 serial socket. This is what interest us due to his voltage regulator (3.3~5v), here you can see the first soldering for tests. I’m sorry i haven’t any microscope,soldering will be messy.
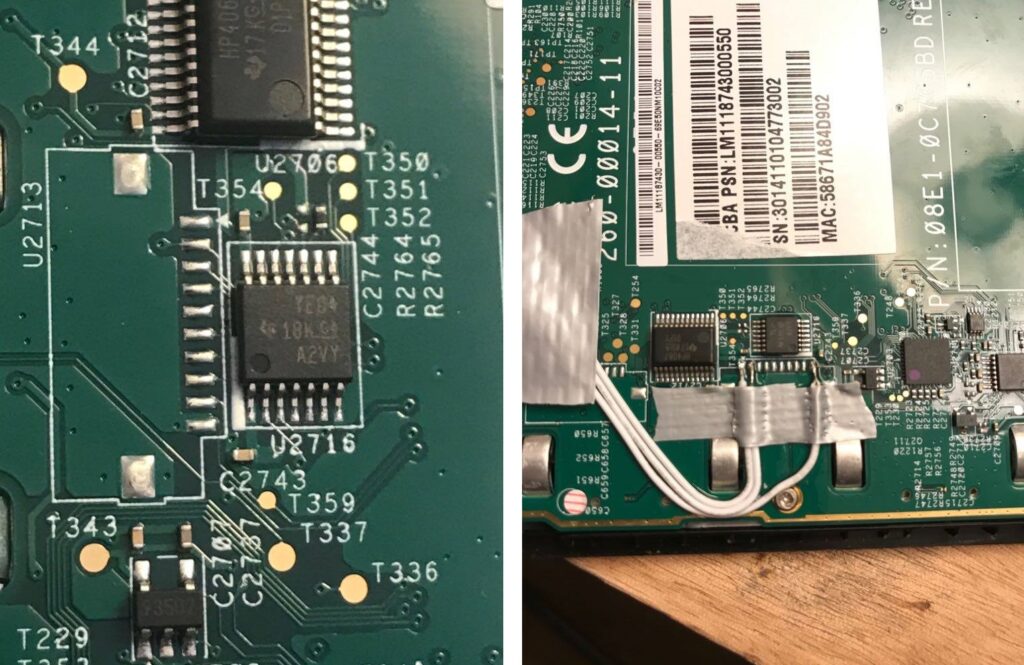
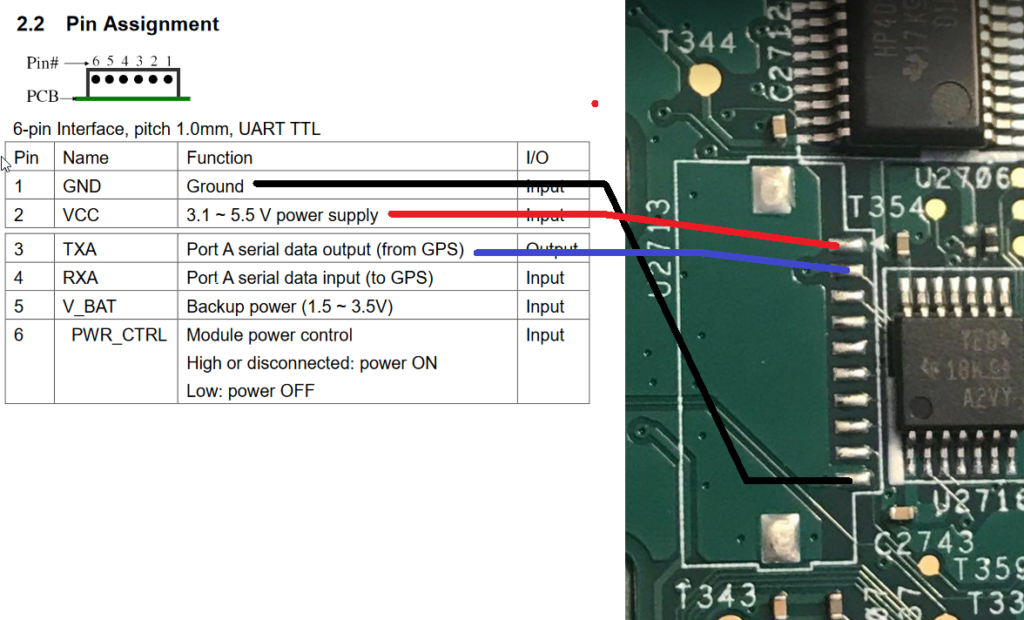
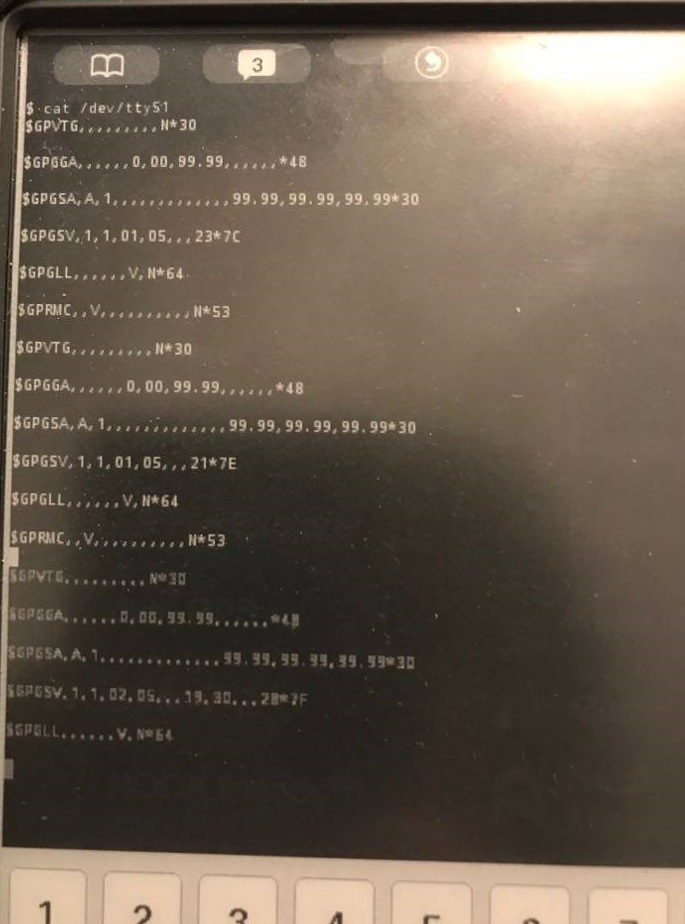
Ok let’s go try to boot the Nook for what we can get. The data should be sent thought the serial port directly from the GPS module on # /dev/ttyS1 according to this XDA serial pinout research thread.
I’m quite happy, it look like GNSS data 🛰️🙂
I’m going to do a better job on the soldering and the circuit. because i would have the hability to take off the power of the module to keep the power safe, also according the datasheet of the GP-735 there is an « Hardware power saving control pinallowing power on/offGPS via GPIO »

So i have to make a little low/high power circuit for driving this GPIO pin to allowing me to put the GPS module in low power mode when unused.
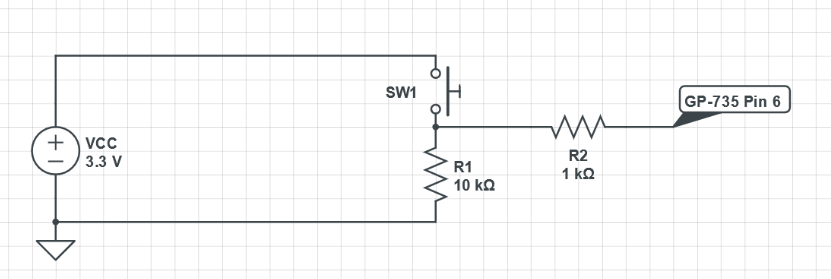
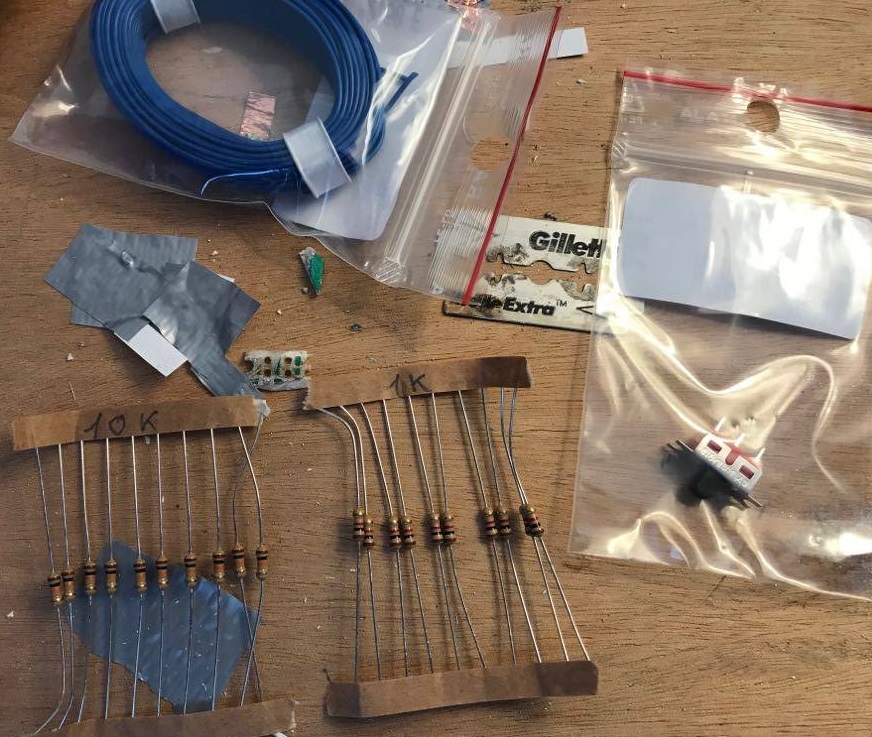
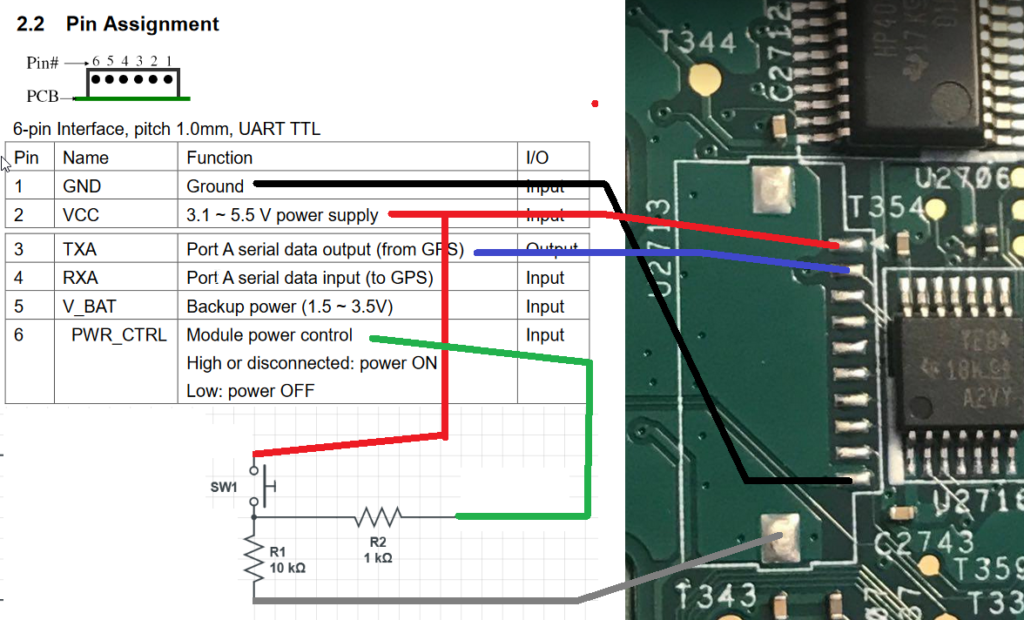
I’m sorry i have stopped taking photography at this point but the result were here, commutting the switch will pausing/resume the GNSS data flux.
We are now receiving positionning data. 🌍🛰️
Bridging the GPS module and the OS
Luckily for me, somes workarounds have already been thinked and built to work for externals GPS modules with the native function of android.
One of thoses solution use a pretty smart principe, because it will feed the mock location originaly designed for developers to simulate GPS data. Originaly the purpose of this function is to test devs apps services, but it’s a pretty good way to spread the positioning feature to the entire system but we need something to transposing the serial /dev/device data to the mock location.
The app who will do the job is called UsbGps4Droid.
But in first we have to activate the mock location on the nook. It must be done throught the shell, because there is no GUI options in parametters menus.
# On the rooted nook
Connect the nook to the Wi-Fi, Run the ADB Konnect app, Start wireless ADB
# From the command line ADB/Fastboot toolbox
adb connect 192.168.x.xxx:5555
# Install Sqlite3 binary on the nook (required for the next)adb shell mount -o rw,remount -t ext2 /dev/block/mmcblk0p5 /systemadb push sqlite3 /system/bin/adb shell chmod 755 /system/bin/sqlite3adb reboot
# On the rooted nook
Connect the nook to the Wi-Fi, Run the ADB Konnect app, Start wireless ADB
# From the command line ADB/Fastboot toolbox
adb connect 192.168.x.xxx:5555
# Install the App and Activate the mock location on the nookadb install UsbGPS4Cupcake_alpha5.apkadb shell > su > cd /data/data/com.android.providers.settings/databases > sqlite3 settings.db sqlite> update secure set value=1 where name='mock_location'; sqlite> .q > reboot
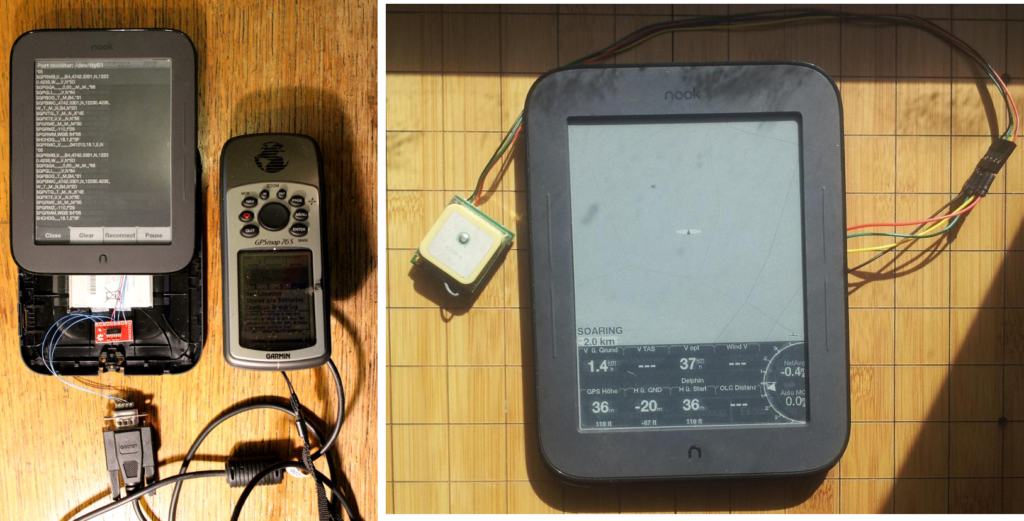
Run the UsbGps app and make him read the /dev/ttyS1 serial port to provide the native mock location to the whole android system.
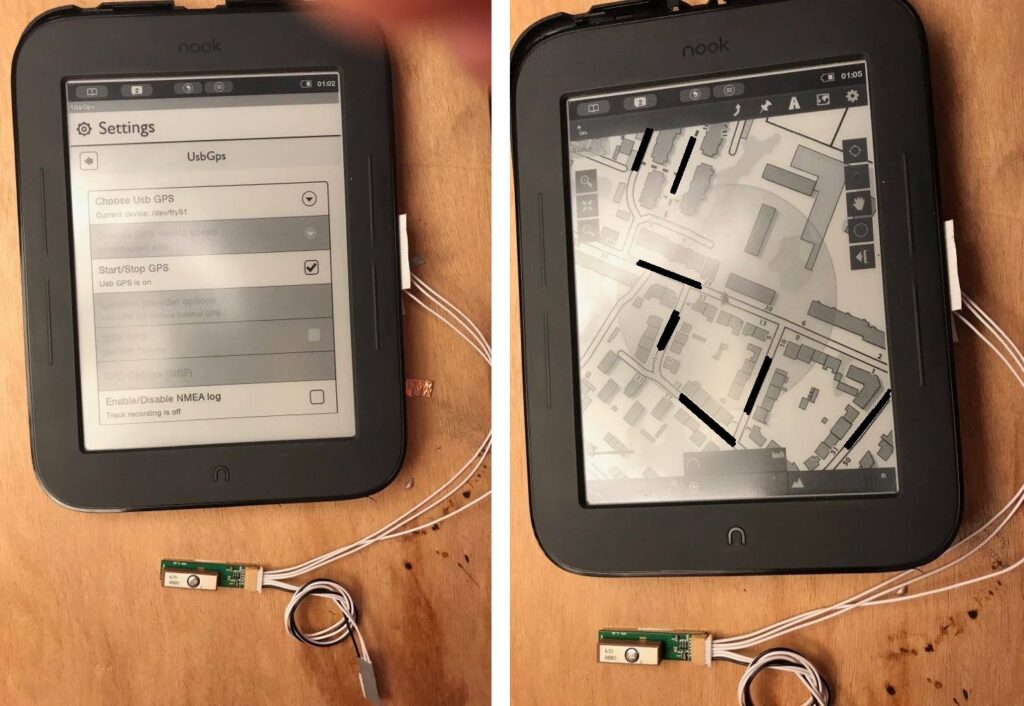
Everything’s work !
So i could stop here, almost all the required specs has been filled. I’m now had a GPS aided navigation map with long autonomy.
In fact the GPS module will fit with difficulty inside the original case of the nook, and by the way i am still forgetting what button i mapped to moove the map. Also the bare e-book will maybe not be strong enough for outdoor usage.
So the idea of making a new and more solid case with a wide space inside for the new componants are emerging in my head. I’m getting inspired by the GoFly V4 project designed for Kobo’s reader.
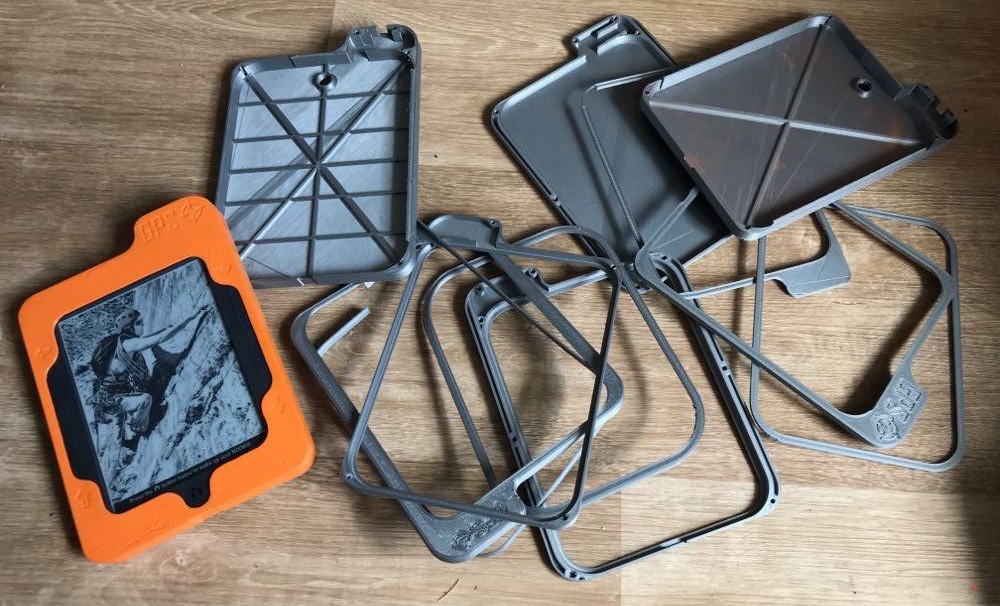
3D printed renforced case
Time and many prototypes has been necessary to acheave this, so i share with you all my plans as an open-source work if anyone want to iterate it.
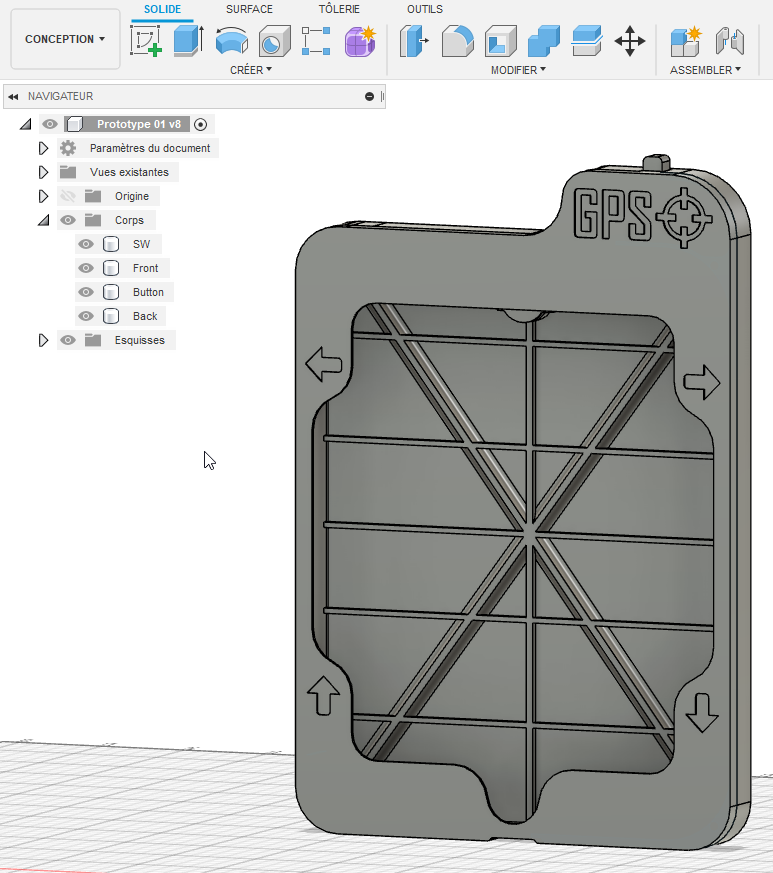
My last trick, due to the largest space unlocked by this case giving a new 2150mAh battery to the nook instead of the old 1500mAh battery to increase the autonomy. If i could remake it, i probably will put directly a 4000mAh i guess, because it will fit perfectly in and more autonomy is never too bad.
The final weight of my Nook is 266 grams.
Hope you enjoy, i will be happy to answer to the question you might have or help in any way. See you next time for a new project.

21 réponses
Very nice 🙂 Awesome work! Thanks for sharing it!
[…] Then I stumbled upon this: https://ludovic.cool/?p=37 […]
Would you explain how you use offline maps from mobac? where to copy them etc.
Great tutorial. I’m just waiting for gps module to go ahead.
Tutorial already exist on MOBAC on internet but yes, i will create a full tuto soon
Hello. I have GPS module that takes 5V not 3.3V like yours. Do you think I can use it? Where could I fing 5V supply on the main board? or should I order proper 3.3V module?
Thanks
Hi, i guess you could use a mini-board to redress 3.3 to 5v or use à multimeter to spot a 5v VCC source on the motherboard but you must perfom many tests to be sure the power still delivrered when the reader is locked !
Thanks. I got proper 3.3V module. tested with arduino and got coordinates, time and date from GPS. still cant get position on oruxmaps on nook. hopefully soon. I’m looking for simple gps app for nook. (like gps status)
I found google maps that work https://www.apkmirror.com/apk/google-inc/maps/maps-5-1-0-release/google-maps-navigate-explore-5-1-0-android-apk-download/download/
but still location is unavailable…
Yes, i’m currently in research / working with skilled android developpers to natively integrated GPS location.
But for time, you need a wraping app to translate NMEA serial data to Android moc location. UsbGps work well for that.
JustGPS is not perfect but working https://apkpure.com/just-gps/net.thenumber42.android.justgps
[…] article is an How To directly linked to my previous article about the E-ink GPS topographic’s map. I’m aware about the difficulty can represent reproducing my work to rebuilding your own […]
Help… I followed your instructions to the letter… But when I use the terminal emulator as you describe I don’t get anything. I installed the GPS hardware you suggested with the same wiring. I used the Atlas Firmware that you provide. Any ideas on how to fix it? I would very much appreciate the help.
Please email: dr.argento@gmail.com
Hello, i’m sorry for the long time response.. the comment section was down under hundred of indesirable spam comment..
I have figured out how to solve this problem then sort the legitimate comments.
So .. Where are you in the setup, the firmware has been flashed successfully ? you have also wired with succes the GPS module ?
Yes, I did everything. And as far as I can tell, it is all correct. I can send you a picture of the screen.
Yes of course you are welcome to send me a picture !
[…] This article is directly linked to my previous project the E-ink GPS topographic’s map eReader. […]
Congratulation for your project, it’s very useful for all outdoor activities.
I have a question. I installed Oruxmap 5.5.22 with success on my Nook sample touch but the contrast is not optimal. I saw that you reach a very good contrast (picture of your nook with Nantes city map at the beginning of this article). Can you please explain what setting did you change to have this very nice map contrast.
Thanks and go luck for your future improvement.
Hello Thank’s John !
The project continue with the Glowlight Plus, but about the Nook Simple Touch by rooting it and install some extra launcher you will be able to customize E-ink parameters to choose between fastest refresh and « high » quality
Great project! But I have run into a problem. I can see the GPS output in a terminal using the cat command described above, but cannot use the GPS signal anywhere else. UsbGPS says « connection problem ». I have tried it using both the Atlas firmware file you provide, as well as a clean Simple Touch image that is only rooted and both have the same result.
Did you enable mock location using sqlite? I was unable to get anything working until I enabled this using adb from my laptop.
In usbgps « choose Usb GPS » should be « /dev/ttyS1 » , gps speed worked for me on auto, but look at the spec sheet for your gps module and see if it mentions the default baud rate, my ublox 6 module default was 9600. Otherwise you can set it on the gps using ublox u-center and a serial to usb adapter. And then on location provider options I have « replace internal gps » and « auto-enable location provider » both checked, mock location provider name is greyed out, and connection retry number is set to 5.
If all of those settings are correct hit the start gps checkbox. Oruxmaps wont show anything until you have a fix, so try starting it up outside and leave it sitting still for 10 or 15 minutes, it can take a sec to get all of the satellite info the first time.
This guide was so helpful, thank you!!!
I used a ublox 6 module that was significantly too large to fit in the original case, so have designed my own case that holds them at the top. I also would recommend setting up multitouch and norefresh using clockworkmod as outlined in this xda forum post. It makes navigation in mapping apps much easier since you can pinch to zoom. https://xdaforums.com/t/nook-simple-touch-nook-multi-touch-screensaver-locking-issue-explanation-added.1563645/page-2#post-24245375
My next step is setting up a hardware switch like you did to be able to conserve power when not using the gps. I’d love to find a way to do this through the nook. I might poke around with sqlite and see if I can find something, I vaguely remember reading that the port used in this mod is generally intended for the cell service/sim card, which can be turned off with airplane mode, so it might be possible?
My brother is part of a research team that goes out into the middle of nowhere to study and band juvenile hawks for about a week at a time with no power or cell reception. They use iButton temperature loggers and currently use a windows laptop to gather the data, but id love to figure out how to integrate an iButton reader into a nook as well so that battery life is not as much of an issue for them. I’ll comment back here again if I can get that working and am able to set a nook up for that group to use.